背景
Android 8.0在odex的基础上又引入了vdex机制,目的是为了降低dex2oat时间。
因为当系统ota后,用户自己安装的应用是不会发生任何变化的,但framework代码已经发生了变化,
所以就需要重新对这些应用也做dex2oat,所以如果有vdex的话,就可以省去重新校验apk里dex文件合法性的过程,节省一部分时间,所以本文分析下vdex的实现机制。
| 文件格式 | 用途 |
|---|---|
| .dex | 存储java字节码 |
| .odex/.oat | optimized dex,ELF格式 |
| .vdex | verified dex,包含 raw dex +(quicken info) |
| .art | image文件,存储热点方法string, method, types等 |
首个VDEX实现相关commit:
1 | commit 7b49e6cade09bc65b3b5f22d45fc9d0a7184e4f2 |
主要目的:降低dex2oat执行耗时
1、当系统OTA后,对于安装在data分区下的app,因为它们的apk都没有任何变化,那么在首次开机时,对于这部分app如果有vdex文件存在的话,执行dexopt时就可以直接跳过verify流程,进入compile dex的流程,从而加速首次开机速度;
2、当app的jit profile信息变化时,background dexopt会在后台重新做dex2oat,因为有了vdex,这个时候也可以直接跳过
原理
应用首次安装时,抽取出其中的dex文件,校验成功后,存储到一个独立的文件中,后面由于jit profile改变,或OTA等原因,而重新进行dexopt时,可以跳过dex文件校验流程
具体实现:
dex2oat关键路径: main() → setup() → compileApp()
1 | // art/dex2oat/dexoat.cc |
由于VDEX优化的是verfiy流程,即校验dex文件的合法性,所以下面主要看一下 WriteAndOpenDexFiles() 函数的实现
1 | // art/compiler/oat_writer.cc |
第1步:打开apk文件,把其中的classes[N].dex文件合并写入到vdex文件
WriteDexFiles流程:此处略过,见后文vdex的生成过程
第2步:map vdex文件到内存,用于后续对其中的dex文件做优化,并写入到odex文件。
如果vdex是刚刚创建的,则还需要vdex里的dex文件部分是否合法,否则便可跳过校验流程,直接进行后续的代码优化流程
OpenDexFiles流程:OatWriter::OpenDexFiles -> DexFile::Open -> DexFile::OpenCommon -> DexFileVerifier::Verify
DexFileVerifier::Verify的主流程:
1 | // art/runtime/dex_file_verifier.cc |
结合一下dex文件的格式: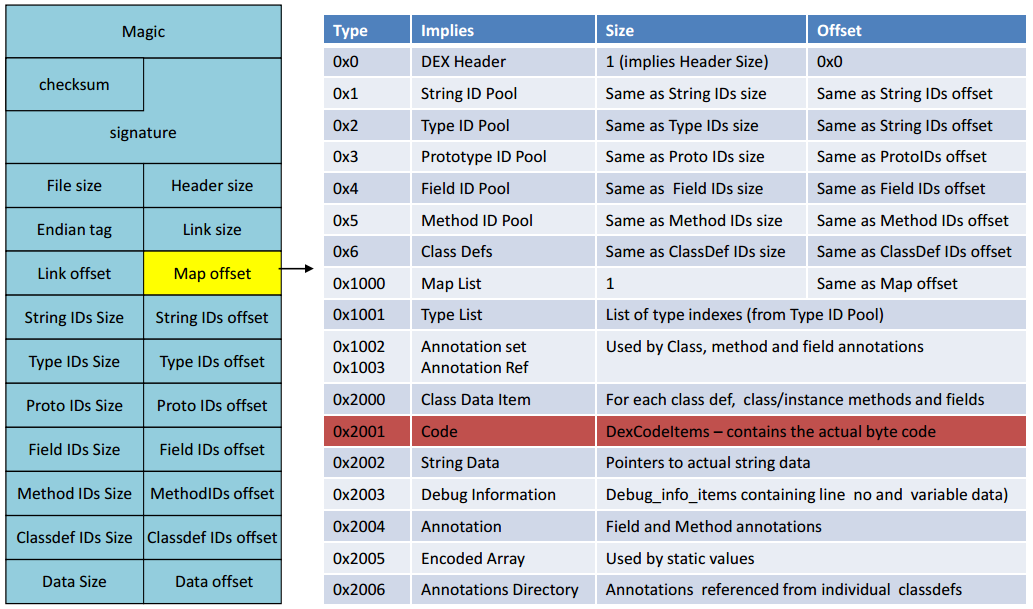
字段含义对照表:
| 名称 | 格式 | 说明 |
|---|---|---|
| header | header_item | 标头 |
| string_ids | string_id_item[] | 字符串标识符列表。这些是此文件使用的所有字符串的标识符,用于内部命名(例如类型描述符)或用作代码引用的常量对象。此列表必须使用 UTF-16 代码点值按字符串内容进行排序(不采用语言区域敏感方式),且不得包含任何重复条目。 |
| type_ids | type_id_item[] | 类型标识符列表。这些是此文件引用的所有类型(类、数组或原始类型)的标识符(无论文件中是否已定义)。此列表必须按 string_id 索引进行排序,且不得包含任何重复条目。 |
| proto_ids | proto_id_item[] | 方法原型标识符列表。这些是此文件引用的所有原型的标识符。此列表必须按返回类型(按 type_id 索引排序)主要顺序进行排序,然后按参数列表(按 type_id 索引排序的各个参数,采用字典排序方法)进行排序。该列表不得包含任何重复条目。 |
| field_ids | field_id_item[] | 字段标识符列表。这些是此文件引用的所有字段的标识符(无论文件中是否已定义)。此列表必须进行排序,其中定义类型(按 type_id 索引排序)是主要顺序,字段名称(按 string_id 索引排序)是中间顺序,而类型(按 type_id 索引排序)是次要顺序。该列表不得包含任何重复条目。 |
| method_ids | method_id_item[] | 方法标识符列表。这些是此文件引用的所有方法的标识符(无论文件中是否已定义)。此列表必须进行排序,其中定义类型(按 type_id 索引排序)是主要顺序,方法名称(按 string_id 索引排序)是中间顺序,而方法原型(按 proto_id 索引排序)是次要顺序。该列表不得包含任何重复条目。 |
| class_defs | class_def_item[] | 类定义列表。这些类必须进行排序,以便所指定类的超类和已实现的接口比引用类更早出现在该列表中。此外,对于在该列表中多次出现的同名类,其定义是无效的。 |
| call_site_ids | call_site_id_item[] | 调用站点标识符列表。这些是此文件引用的所有调用站点的标识符(无论文件中是否已定义)。此列表必须按 call_site_off 的升序进行排序。 |
| method_handles | method_handle_item[] | 方法句柄列表。此文件引用的所有方法句柄的列表(无论文件中是否已定义)。此列表未进行排序,而且可能包含将在逻辑上对应于不同方法句柄实例的重复项。 |
| data | ubyte[] | 数据区,包含上面所列表格的所有支持数据。不同的项有不同的对齐要求;如有必要,则在每个项之前插入填充字节,以实现所需的对齐效果。 |
| link_data | ubyte[] | 静态链接文件中使用的数据。本文档尚未指定本区段中数据的格式。此区段在未链接文件中为空,而运行时实现可能会在适当的情况下使用这些数据。 |
CheckHeader():校验dex头信息(见上面dex文件结构图左半部分)
校验实际文件大小与dex头文件里保存的file_size是否一致;
计算dex文件的checksum,然后与dex头里保存的checksum对比,检查是否一致;
比较dex文件的字节序(endian_tag)与当前机器的字节序是否一致,目前dex使用的都为小端序(little-endian);
检测dex文件头里保存的header_size是否存在异常;
检查link_off, link_size, map_off, map_size…..等字段的是否合法,例如string_id偏移是否超出了dex文件本身长度,string_id偏移是否正确的对齐(align)了,定义的类/方法数是否超过了65536个
CheckMap():
当dex文件被映射(mmap)到内存后,map区域(mmap起始地址+ map_offset)就可以被看做一个list(MapList),这个list的每一个item(MapItem)分别表示了header, stringId, typeId, methodId, fieldId, …code等不同类别
MapList的结构如下:
1 | struct MapList { |
CheckIntraSection():
intra翻译:同一事物内部各部分之间
checkPadding(): 前后两个不同类型的item之前的是否正确的对齐了,例如用于对齐的每个字节的值必须为0,两个mapitem的地址(MapItem.offset_)不能有相交(overlap)
若MapItem.type_是header, string_id, typeId, proto_id, field_id, method_id, class_def, callSizeId, methodHandle, typeList, anotationSet等类型的话:
1) 检查其MapItem.offset_/MapItem.size_是否与dex头部存放的相应xxx_off_/xxx_size_(若存在)相等,
2) 根据MapItem.offset_和MapItem.size_,就能够遍历该类型mapItem指向的所有item,检查这些StringId/TypeId/ProtoId…里存放的offset是否合法(不超出系统可用内存大小,不超出dex文件末尾地址)
3) 若MapItem.type_是classData, codeData, stringData等 这几个类型的话:
类似第2步,检查各mapItem本身的地址偏移是否合法,实际指向的item数组里各项的offset是否合法;
对于classData类别,校验每项item对应的class下所有的静态/非静态字段与方法的合法:
1 | // Iterate and decode class_data_item |
校验该类所有filed/method的**meber index**是有序,是否有越界;
根据filed/method的**member index**从filed_ids/method_ids链表找到对应的项,再利用filedId/methodId里的class_idx遍历class_def 链表,找出对应的该field/method所属class_def项,并校验该类下所有field/method的均含有一致的class_idx;
校验该类下的所有field/method的访问标志符的合法性: private/protected/public 仅能有其一,是否定义了未知的flag, 一个方法不能 同时声明virtual和direct, 虚方法不能同时声明有final/private/static/...;
校验name_idx是否合法:能否根据其解析出方法的字符串;
检查method的code_off_合法性:native/abstract 方法不能有code,所以其code_off_须为0;相反的,其他类型的方法则其code_off_不能为0,等等;
...
4) codeItem: TL;DR
5) stringData: TL;DR
…
CheckInterSection():
*inter:不同事物之间*
在checkIntraSection()函数执行过程中,每校验完一个位于data section的item时,如stringData, classData, codeItem…等时,就会把他们的地址偏移与类型给记录到一个hash表offset_to_type_map_中
1) 遍历string_id区所有项:
1 | struct StringId { |
检查string_id里存储的string_data_off_是否合法,即能否在offset_to_type_map_查找到匹配的记录,所有的string_id项已按照其指向的字符串字典序排好序了
2) 校验type_id区所有项:
1 | struct TypeId { |
检查type_id项里存储的descriptor_idx_是否合法,即能否在根据该idx解析成该type的字符串表示,并检查所有项是否已按照descriptor_idx_从小到大排序
3) 校验proto_id区所有项:
1 | struct ProtoId { |
检查能否根据 parameters_off_ 在offset_to_type_map_里查到相应记录, 并检查所有的参数是否合法
能否根据short_idx_正确decode出字符串表示
检查return_type_idx_是否越界(65535),能否由其最终正确解析出它的字符串表示形式
检查所有proto_id项是否已根据return_type_idx_, 参数的type_id排序
4) 校验所有的filed_id:TL; DR
5) 校验所有的method_id:TL; DR
…
vdex的生成过程
vdex文件结构
| magic: 4字节 | version: 4字节 | dex[0] | dex[1] | … | dex[N] |
定义见:art/runtime/vdex_file.h
生成过程
OatWriter:WriteAndOpenDexFiles()
-> WriteDexFiles() -> WriteDexFile() -> ZipEntry.extraTo(vdex_file)
-> WriteVdexHeader()
这一步主流程很简单,就是把apk里的dex文件抽取抽取然后写入到vdex文件里,最后写入vdex版本号和校验和,比较麻烦的是写入文件的时候要做4字节对齐,所以每次写入一个dex文件都要先设置好文件偏移,这样后面map这个vdex里时候能够提高效率。
主流app的dex文件校验耗时:
| App名称 | 版本 | dex文件总大小/包体积 | verify耗时 | dex2oat总耗时(4线程) |
|---|---|---|---|---|
| 微信 | 6.5.23 | 41.8Mb / 54Mb | 2.681秒 | 13.376秒 |
| 支付宝 | 10.1.8.112305 | 40.8Mb / 58Mb | 2.768秒 | 13.764秒 |
| 淘宝 | 7.2.3 | 11.6Mb / 76Mb | 692毫秒 | 3.641秒 |
| 今日头条极速版 | 6.1.9 | 4.8Mb / 2.9Mb | 242毫秒 | 1.899s |
新版VDEX结构
到Android 9.0上,vdex结构变的丰富了:
1 | // VDEX files contain extracted DEX files. The VdexFile class maps the file to |
增加了VerifierDeps和QuickeningInfo,其中VerifierDeps是用于快速校验dex里method合法性的,它是在第一次dex2oat的时候生成,
后面再做dex2oat的时候可以根据这个信息,就不用挨个分析字节码了(虚拟机总是向前兼容的),只要确认依赖的类存在就ok了,详细可以看:
1 | commit ca3c8c33501bf199d6fd0a5db30a27d8e010cb23 |